
RESTORATION
RESTORATION


Ercol Dining Chairs and Carver
This is a set of 4 Ercol dining chairs plus 1 carver that needed major restoration to the polish work as there were many scratches to the surface and the colour was faded and worn. Firstly, I stripped off the damaged polish, then lightly sanded to give a good surface for the new polish to key to, the chairs were then stained and coloured to blend with the customers existing furniture and were polished and waxed in the traditional method.


Rocking Horse Restoration
This lovely rocking horse had been neglected, damaged and hidden away in the customer’s attic for many years. As the customer really liked the horse and it had been in the family she thought it a shame to hide it away any longer so brought it in for restoration. The 2 broken legs were repaired and as the finish was in a poor condition, it was re-french polished in the traditional method. This restoration created a lot of interest throughout the process.


4 Mahogany chairs from the early 20th Century in a Queen Anne style
These chairs arrived in a very poor condition with broken down polish, paint splashes and loose joints. The seats were sent to the upholsterer for re-covering and the cabinetmaker re-glued the joints on each chair. Once the chairs had been made stable, I stripped off the old polish and paint, sanded the chairs to prepare them for the new polish and then completed the process by hand French polishing them in the traditional way.


Oak Baptism Font
This Oak Font was bought in from the local church for cleaning and reviving because the polish was run down, there were signs of water damage and the previously filled nail holes were visible.
I cleaned off existing traces of polish and built up layers of new French polish in the traditional method. Incorporated into this process was a considerable amount of touching up to disguise each of the vast number of visible nail holes to blend in with the rest of the font. Once finished, the item was heavily waxed to give some added protection against future water damage.


Country Style Rocking Chair
This chair is made up of Ash seat and Beech frame and was bought in for repair and restoration. Repairs were made to the back splats and all joints were re-glued. I stripped off the old surface and sanded as necessary then pigment stained to blend in the different timbers, repairs and blemishes. This was then polished and waxed in the traditional method to give a satin smooth finish to the chair.

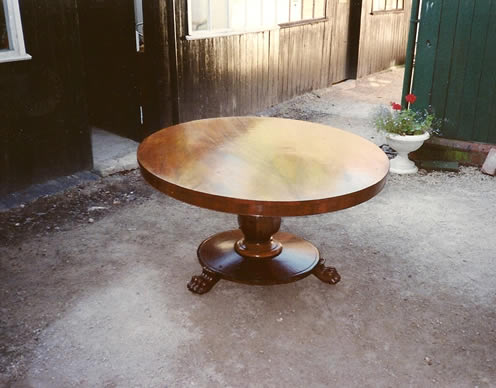
Victorian Mahogany Flip Top Table
This table was stripped and cleaned down then re-polished to a rich mahogany colour to blend with the existing dining chairs of the customer.


Walnut Inlaid Pedestal Sewing Table
This had been stored in a barn for many years but the vaneers were relatively undamaged. It was cleaned to remove residue. The inlay and marquetry were sealed to preserve natural colour and the rest of the table was stained, coloured and false grained to blend in any imperfections which are common in walnut vaneers.
Heat Resisting Pale French Polish
This is my polish of choice as it is one of the best products available for interior finishing of wood. In essence, this is a modified French polish, which gives the classic high-class finish and elasticity of a shellac product (French polish) with a degree of heat resistance comparable to many modern materials.
When finished off with a good quality polishing wax, you have the combination of heat and liquid resistance plus the beauty of traditional French polish.
French Polishing Process
I recently restored a Mahogany Table. Here is an explanation of the polishing process I used from start to finish.
Table Top – Stages of Polishing
The top has many ring and watermarks plus a general cracking of surface polish. This is too severe for reviving so full re-polishing is necessary.
Stripping
- First of all, preparation is vital. All traces of existing polish must be removed to achieve a good quality finish. A mild chemical that dissolves polish is applied to the surface with a brush and then the polish removed with very fine wire wool soaked in spirit.
- A light sanding is required for the new polish to key properly.
Base Stain
- I blend a variety of light-fast stains until I have a colour slightly lighter than the under-frame which I then apply with wadding. The polish will be darkened later in the colouring stage.
Bodying Up
- French polish is soaked into a rubber (a fine polishing wadding wrapped in a small square sheet of cotton) and is applied to the surface. The process of application requires the rubber to be moved in various motions i.e. figure of eight, swirls and waves so the polish can be forced into the grain.
Cosmetic Filling
- For authenticity, the majority of scratches and dents are not filled but un-sightly faults can be filled with wax mixed with pigments and colours. The table is then bodied up as before.
Touching Up
- This process is to disguise scratches and marks and involves the blending together of French polish with different colours and pigments, in a similar way that an artist would mix paints on a pallet. The colour mixes are applied with a pencil brush and each blemish may require a different colour mix to disguise the fault.
Colouring
- Mild colours are added to the polish and applied by a combination of mop brush and rubber following the grain of the wood.
Finishing
- The surface is bodied up as before, but the French polish is gradually thinned with spirit and sprinkled with linseed oil.
Patina Waxing
- Before the finishing coat is completely dry a slightly abrasive wax is applied to the surface. This gives the affect of aging the French polish and achieving a lovely satin sheen.
Under-Frame
As the under-frame is in a reasonable condition, it only required touching-up and freshening-over with French polish.
Touching Up
- As above to disguise scratches and marks.
Freshen Over
- Nib the item with very fine glass paper, touch up any marks, body up surface to seal, then apply wax to finish the process.